How to Convert an Epson to Sublimation: The “No-Clog” Reality Guide

epson ecotank printer filled with sublimation ink and sublimation paper with the title "epson ecotank sublimation printer"

When I first converted an Epson EcoTank to a sublimation printer, I thought I’d found the ultimate hack. Years later, I’m still cleaning black ink off my floor and fighting with ‘overfill’ sensors that are designed to brick your machine. Converting a printer is a fantastic way to save hundreds of dollars, but it’s not a “set it and forget it” project. Between the messy bottle designs and the inevitable clogs if you let it sit, there’s a steep learning curve. In this guide, I’m sharing the “warts and all” reality of my conversion journey so you can avoid the mess I made.

Table of Contents

Note: Some links in this post may contain affiliate links, which means at no cost to you, I may earn a commission.

showing the front of a refurbished epson ecotank 2800 printer without any ink in it

Why You Should Start With a Brand New Printer

I get asked all the time if you can just grab a used Epson EcoTank from Facebook Marketplace or a thrift store to save even more money. While I love a good bargain, I highly recommend starting with a brand new printer for your conversion.

The Contamination Risk

Sublimation ink and standard inkjet ink are completely different “animals.” If a printer has already been used with regular ink, there will be residue left in the internal lines and the print head. Even a tiny amount of old ink can contaminate your sublimation colors, leading to splotchy designs or, even worse, permanent clogs that you can’t fix.

The “Point of No Return”

The most important thing to remember is that once you put sublimation ink into a new Epson, there’s no going back. You’ve officially “converted” it, and it can’t be used for regular document printing ever again (unless you do these same conversion steps, but with regular ink). Because this is a one-way street, starting with a factory-clean machine gives you the best chance of success. You’re investing in a “blank slate” where the only thing in those lines will be the high-quality sublimation ink you chose.

A Note on the Warranty

Just a heads-up, the second you pour that third-party sublimation ink into your new Epson, you’ve likely voided the manufacturer’s warranty. This is why it’s so important to get the initial setup right. You’re becoming your own tech support, but the hundreds of dollars you’ll save on not buying a fancy sublimation printer makes that risk worth it for most crafters.

open tank of an epson ecotank printer with black sublimation ink all over it and the table

The Honest Truth: My Biggest Conversion Messes and How to Avoid Them

Most guides make converting a printer look like a five-minute craft project that’s always perfect. I’m here to tell you that if not done correctly, it’s messy, it’s frustrating, and sometimes it’s just plain stupid. Here are the four biggest issues I’ve run into over the years and what I’ve learned the hard way.

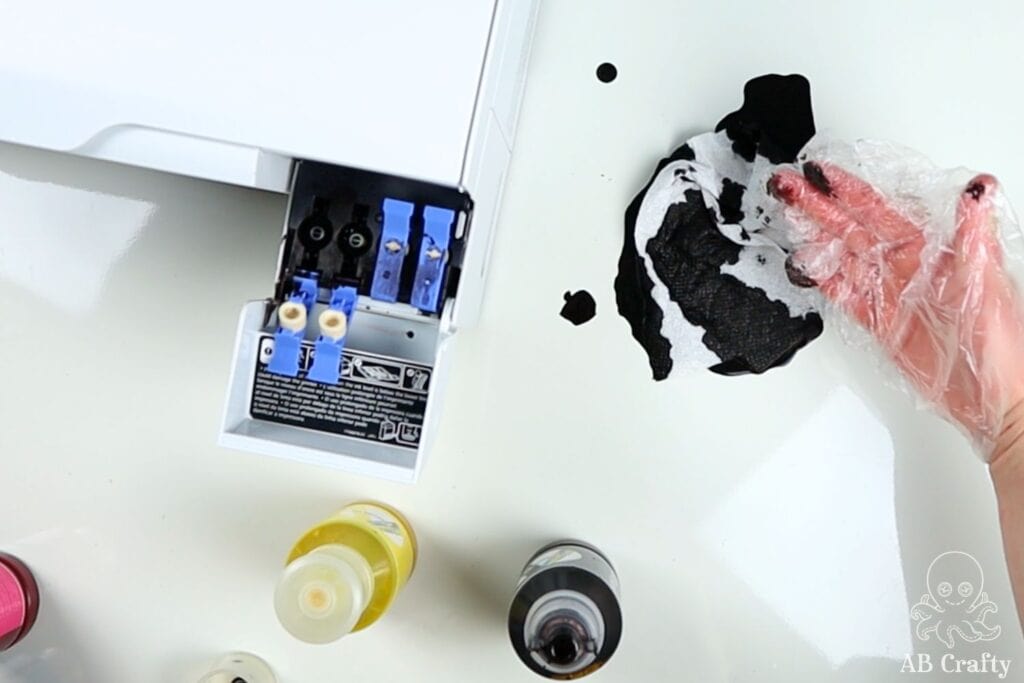
1. The Black Ink Disaster

The first time I added black sublimation ink to my printer, it was a complete catastrophe. I was using those flip-top bottles that are supposed to “lock” into the machine. Instead of going into the tank, the black ink didn’t actually flow in, it just leaked everywhere. Since the other color tanks are also open during the fill, I almost contaminated every single container. Years later, that printer still leaks black ink from the bottom. It’s a mess I’m still living with, and it’s why I’m so careful about bottle designs now.

2. The 30-Day Clog

I once went an entire month without using my printer. When I finally tried to print, it was definitely clogged. Luckily, I was able to save it by running the standard printer cleaning and alignment tools through the printer’s own menu. It’s a good reminder that you’ve gotta keep the ink moving, kind of like how you shouldn’t let a car sit in the garage for months without starting it.

3. The “Total Flush” Nightmare

After letting the printer sit for several months, a standard cleaning wasn’t enough. It’s so clogged now that I’m going to have to do a full flushing of the lines to get it running again. If you’re going to convert a printer, you’ve got to commit to printing something, even just a tiny test page, every week or so. If you don’t, you’re looking at a massive headache down the road.

4. The “Overfill” Software Trap

Epson builds a “waste ink” sensor into their printers that will eventually brick the machine once it thinks the internal pads are full. I’ve actually taken my printer apart to remove and clean the filter thing myself, but the software still says it’s full and won’t work. It’s a frustrating design choice that’s basically meant to force you to buy a new printer. There are ways to hack the system and reset it, but you’ve gotta be prepared to play tech support when it happens.

Get the latest DIY tutorials, reviews, and crafting updates

You'll never be spammed and can unsubscribe at any time

epson ecotank printer filled with sublimation ink and sublimation paper

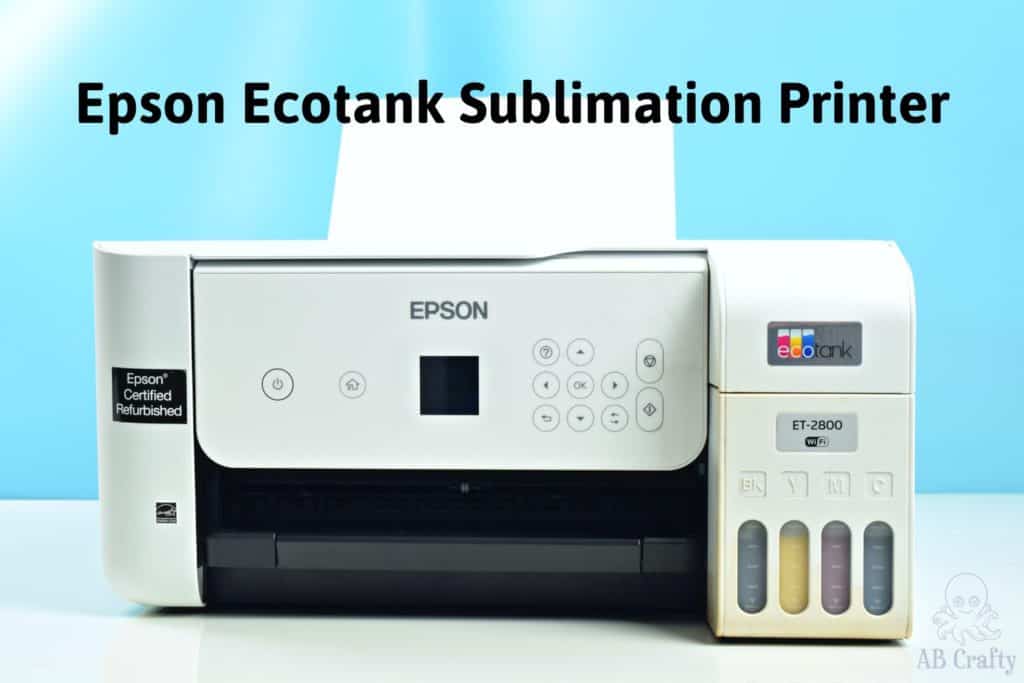
Why an Epson EcoTank is the Best Choice (The Science)

The advantage of an Epson Ecotank sublimation printer is it doesn’t use ink cartridges. You simply add the ink directly into the printer. This makes it easy to set up and refill as needed without having to worry about buying cartridges, filling them, and hoping the printer will scan the chips properly.

Furthermore, other printers (such as some HP or Canon printers) use heat to evaporate the ink through the printer lines. If you try to put sublimation ink through a heated print head, the ink will do it’s thing and vaporize and come back to dye whatever synthetic element it’s touching. It would effectively sublimate the printer’s lines.

Epson’s EcoTanks, on the other hand uses Piezo technology, which means it uses pressure instead of heat to push the ink out. Since the print head stays cool, the sublimation ink will flow through perfectly without gassing out early. Plus, because there aren’t cartridges and you’re just pouring ink into a tank, it’s the most cost-effective way to get into the hobby.

The other advantage of the Epson Ecotank printer is that it’s one of the cheaper printers and readily available (I got mine on eBay, but you can also get it from Amazon, for example).

A sub sublimation ink in yellow, pink, blue, and black

Choosing Your Ink: Why the Bottle Design Matters

When you’re looking for sublimation ink, it’s easy to focus on the color quality or the price, but after years of cleaning up messes, I am telling you that the bottle design is just as important. Most “beginner” ink kits come with two types of tops, and choosing the wrong one can lead to a permanent black stain on your table (ask me how I know).

The Flip-and-Push Trap

A lot of the ink bottles you see online are designed to flip over and “lock” into the Epson ports. This is actually what I show in my original photos, but I have a major warning. The first time I used these, the black ink didn’t actually go into the tank, it leaked everywhere. To make it worse, the other color tanks were also open, so I almost contaminated the entire machine with black ink. Years later, that printer still leaks black ink from the bottom.

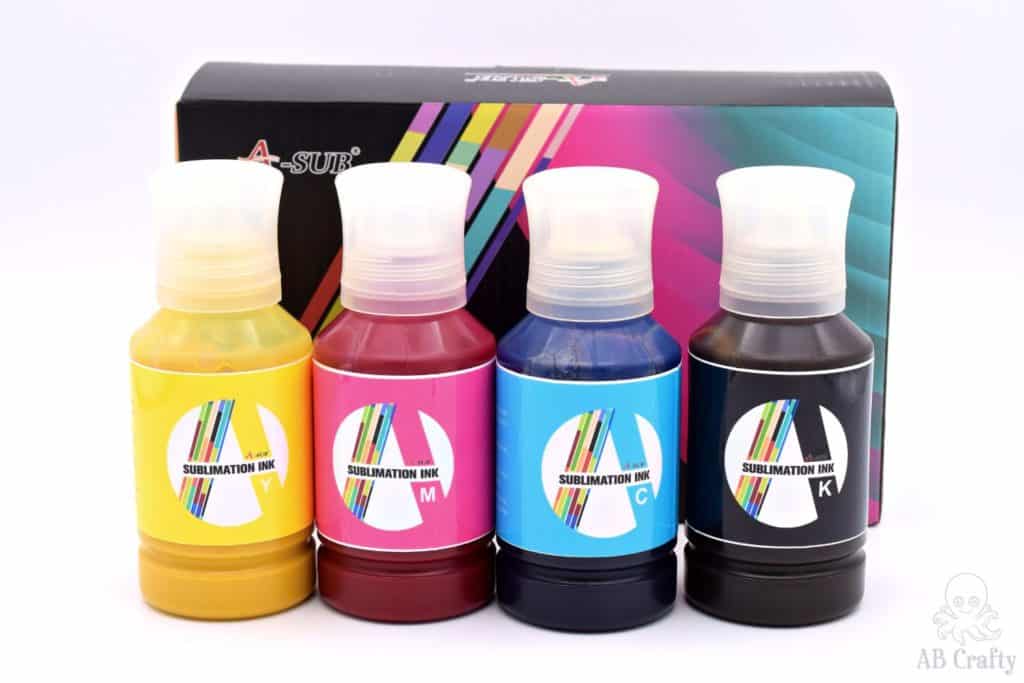
The Needle-Injection Method

If I were starting over today, I would only trust the bottles that use a needle to inject the ink. It might seem like more work, but it is so much cleaner. You have total control over where the ink goes, and there is almost zero risk of a “blowout” that ruins your desk or your other ink tanks.

The “Needle” Hack: If your favorite ink only comes in flip-top bottles, you can always use a separate syringe and needle to pull the ink out and inject it into the printer manually. It is an extra step, but it will save your floors.

My Top Recommendations:

I have a full post on the best sublimation inks, but here’s a short summary:

  • Hiipoo Sublimation Ink (Amazon): This is a fan favorite for a reason. The colors are vibrant, and they often offer both bottle styles. Just be careful with the flip-tops! I’ve only linked to the syringe style.

  • Printers Jack (Amazon): Another solid “budget-friendly” option that’s quite popular

Which Printers Can You Convert to Sublimation?

While there’re several types of printers you can convert, Epson is the most popular brand for a reason. I chose an Epson EcoTank 2800 for my own setup because it’s simple and the price is right (I got mine refurbished so it was even cheaper), but you can use this same guide to convert almost any EcoTank model.

The Science: Pressure vs. Heat

The main thing is that your printer must be an inkjet printer that doesn’t use heat. Most printers use “thermal” printing, which boils the ink onto the paper. If you try that with sublimation ink, it’ll heat up, sublimate, and dye the inside of your printer before it ever touches the paper. You want a printer that uses “Piezo” technology, which uses pressure instead of heat to push the ink out.

The “New vs. Used” Debate

I strongly recommend using a brand new printer. It’s absolutely possible to find a super cheap used printer on Marketplace, but you’ll have to go through the grueling process of cleaning out the lines to ensure there isn’t a single drop of regular ink left. If you’re determined to go the used route, I recommend using Koala’s printer flush to clean the lines multiple times. However, given how easy it’s to ruin a shirt with contaminated ink, a new “blank slate” printer is usually worth the investment.

The Best Epson Models for Conversion:

    • Epson Ecotank (Any Model)Amazon: These are the easiest because they have built-in tanks. You just pour the ink in and go.
    • Epson Workforce ST / ST Pro (Any Model)Amazon: Slightly more expensive than the Ecotanks
    • Epson Workforce WF / WF Pro / Pro WP (Any Model)Amazon: These are often cheaper upfront, but they require you to buy separate refillable cartridges and fill them yourself. It’s an extra step that can be a bit more finicky than the EcoTank’s tank system.
    • Epson Expression XP (Any Model)Amazon: These also require refillable cartridges.
    • Epson Artisan 1430Amazon: This is a “holy grail” for large-format printing, but it also requires cartridges and for the price, you might as well look at dedicated sublimation printers.


Don’t forget to pin it so you can easily come back to it later!

epson ecotank printer filled with sublimation ink and sublimation paper with the title "DIY tutorial - sublimation printer - how to convert an epson ecotank into a sublimation printer, abcrafty.com"

What you need to convert an Epson Ecotank Sublimation Printer

Thankfully making an Epson Ecotank sublimation printer (or converting any inkjet printer to a sublimation printer) doesn’t require any fancy tools – it’s simply a matter of replacing the ink with sublimation ink. Therefore all you need is the printer, the sublimation ink, and then you’ll want to pick up some sublimation paper to print on (this is the type I use by A-Sub).

    • InkJet Printer (I used the Epson Ecotank 2800, which I got refurbished from eBay for over $50 cheaper than a new one – I highly recommend going this route)
    • Sublimation Ink (this is the one I recommend because it uses syringes)
    • Printer Paper
    • If the printer is used, you’ll need printer cleaner (Amazon)

Instructions to Make an Epson Ecotank Sublimation Printer

Step 1: Prepping Your Printer and the "Blank Slate" Rule

Converting an Epson EcoTank is a straightforward process, but since it is a “one-way street,” you’ve got to be focused from the very first drop of ink. For this guide, I’m using an Epson ET-2800 (I actually got mine refurbished from eBay), but the steps are the same for most EcoTank models. You can see in the photo that the four ink columns are completely empty, which is exactly what you want before you start.

Start with the printer unplugged. You want to fill it with the sublimation ink before you plug it in and turn it on. This ensures the internal lines don’t try to “prime” themselves while they’re still empty, which can cause air bubbles that are a nightmare to clear out later.

Note: If you’re using a used printer, you’ll first need to flush the lines using a printer cleaner such as this one. It’s best to clean it a few times to be 100% certain their is no more residual ink. If even a tiny bit of standard ink stays in those lines, it’ll contaminate your sublimation colors and could lead to permanent clogs.

showing the front of a refurbished epson ecotank 2800 printer without any ink in it

Step 2: Choosing Your Ink and Avoiding the "Bottle Trap"

Next, you’ll need your sublimation ink. I’ve used A-Sub / Koala sublimation ink from Amazon for years. It’s a popular choice because many of their bottles are designed to fit directly into the printer’s intake ports, which sounds like a dream for a quick setup. However, this is exactly where things can go sideways.

The “Lock and Fill” Warning

While these bottles are designed to “lock” in, they aren’t always foolproof. If the bottle doesn’t sit perfectly, the ink won’t actually flow into the tank, it’ll just leak everywhere. This is how I ended up with permanent black ink stains on the bottom of the printer and my table. If you’re using these, I’d recommend having a thick layer of paper towels down and keeping a very close eye on the ink level as it fills.

The Syringe Alternative

There are other ink brands where you’ll need to use a syringe and needle to fill the printer reservoirs. Even though it’s an extra step, it’s actually much cleaner and gives you way more control. If your ink kit doesn’t come with a set of syringes, you can pick them up for a few dollars on Amazon. If I were starting over today, I’d probably use a syringe every single time just to avoid the risk of another blowout.

For a deeper dive into which brands I trust, you can also check out my full guide on the best sublimation inks to find the one that fits your budget.

A sub sublimation ink in yellow, pink, blue, and black

Step 3: Loading the Ink and Avoiding Cross-Contamination

Prepping the Bottles

Now it’s time to actually fill the tanks. This is the part where you need to be the most careful, especially if you’re using those flip-and-push bottles.

To load the ink into the printer, unscrew the top and remove the seal. For the A-Sub / Koala inks I used, you need to remove the main top and unscrew the inner lid. Make sure you do this over a paper towel just in case there’s any stray ink on the seal.

removing the cap of the black a sub sublimation ink

On the front of the printer, locate the ink reservoir window. You’ll see labels for BK (Black), Y (Yellow), C (Cyan), and M (Magenta). Pull the front panel toward you to access the loading area.

Get the latest DIY tutorials, reviews, and crafting updates

You'll never be spammed and can unsubscribe at any time

epson ecotank 2800 with labels showing the different ink colors

The Filling Process

Lift the lid for the specific color you’re filling.

Pro Tip: Only open one lid at a time. During my first conversion, I had multiple lids open and when the black ink leaked, it almost contaminated the other colors. Keeping the other lids closed is a simple way to save your printer from a total disaster.

pointing to the open ink cartridge to put the sublimation ink

Then flip the bottle of sublimation ink straight up and down and carefully push it into the hole. You should feel a slight “click” or hear the ink begin to glug into the tank. The ink will automatically begin to fill and should stop once it’s full.

Using a Syringe

f your ink requires a syringe, draw the ink into the syringe first. Carefully place the tip of the needle into the intake hole for the matching color. Since you’re the one controlling the flow, keep a close eye on the front of the printer. Never fill past the max fill line. If you overfill the tanks, you’re just asking for leaks and sensor errors later on.

placing the black ink into the fillable cartridge on the epson ecotank 2800 printer

Once the first color is filled, remove the bottle by gently pulling it straight up (without squeezing the bottle). Then close the top to the cartridge.

Repeat the process with each color.

yellow sublimation ink filling the cartridge on an epson ecotank sublimation printer

Step 4: The Initial Startup and Alignment

Once you’ve got all of the colors filled, it’s time to plug in the printer and follow the on-screen setup instructions. This part’s exciting, but you’ve gotta be patient. The printer’ll go through a “priming” process that pulls the ink from the tanks into the internal lines and the print head for the first time.

Don’t Waste Your Good Paper

You’ll need to go through several alignment and test prints to make sure everything’s printing perfectly. Pro Tip: Don’t use your expensive sublimation paper for this! Use regular, cheap printer paper for all your test prints and nozzle checks. You’re just going to throw these away, so there’s no reason to waste your good supplies.

The “Top-Off” Rule

Because this initial process fills the long internal lines with ink, you’ll notice the ink levels in your tanks drop a bit. While you’ve still got the bottles out, this’s a great time to “top off” the reservoirs back to the max fill line. Just remember my rule: only open one lid at a time to avoid a cross-contamination nightmare.

The “No-Clog” Commitment

Once everything is aligned and your nozzle check looks perfect, your Epson EcoTank sublimation printer’s officially ready to go! But remember, the battle is just beginning. To avoid the clogs I mentioned earlier, commit right now to printing a small test page every week or so. Think of it like a “workout” for your printer to keep those lines from seizing up.

Now that your hardware’s ready, don’t forget to grab some high-quality sublimation paper (I use this brand) and check out my No-Fade Guide to Sublimation Shirts to start your first project!

epson ecotank printer filled with sublimation ink and sublimation paper

Get the latest DIY tutorials, reviews, and crafting updates

You'll never be spammed and can unsubscribe at any time

Your Weekly Maintenance Schedule: How to Avoid Clogs

Now that you’ve got your printer set up, your biggest job is to make sure it stays running. Sublimation ink’s much thicker than standard ink, so if you let it sit, it’ll turn into a “brick” inside your print head. Based on my own nightmare with a several-month clog, here’s the schedule I recommend to keep your printer healthy.

The Task How Often? Why it matters
The “No-Clog” Test Print
Once a week
This is the most important step. Printing a small color block once a week keeps the ink moving so it doesn’t dry out in the nozzles.
Nozzle Check & Alignment
When the test print looks off
If the test print has streaks or is missing sections of color, it’s time to clean the nozzle. Keep in mind, nozzle cleanings fill the waste pad more quickly, which means the software will try to shut you down.
Ink Level Check
Before every big project
Never let your tanks run dry. If air gets into the lines because the tank was empty, you’ll be fighting splotchy colors for weeks.
The Paper Dust Wipe
Once a month
Use a lint-free cloth to gently wipe the rollers. This prevents the “pizza wheel” marks that happen when ink gets stuck to the rollers.

The "Overfill" Hardware Reality: Can You Really Hack It?

Eventually, if you use your converted printer enough, you’re going to hit a wall. Epson builds a “waste ink” sensor into their machines that’ll eventually brick the printer because it thinks the internal ink pads are full. This is one of those “planned obsolescence” things that’s designed to make you buy a brand new machine.

The DIY Filter Clean

‘ve actually taken my printer apart to remove this filter thing, rinsed it, and cleaned it out myself to see if I could save it. The result? The printer still said it was full and wouldn’t work. It turns out that cleaning the physical part is only half the battle.

The Software Trap

The “brick” isn’t actually caused by a physical sensor, it’s a software counter. Even if your pads are sparkling clean, the printer’s software will refuse to print until that counter’s reset. While there’re third-party apps and hacks you can use to “reset” this system, just know that once you’re on this path, you’re essentially your own tech support.

My advice? Keep an eye on how many “power cleaning” or nozzle cleaning cycles you run. Each one fills that waste pad faster. If you hit this error, it’s a frustrating hurdle, but it’s part of the reality of hacking a standard printer for a “pro” hobby.

Conclusion: Your Sublimation Journey Starts Here

Converting an Epson EcoTank is the smartest way to get into the sublimation world without spending a fortune on a “pro” machine. Yes, it can be messy, and yes, you have to be your own tech support when it comes to clogs or software errors, but the results are absolutely worth the effort. By following the “Once a Week” maintenance schedule and being careful with your ink fills, you’ll have a powerhouse machine that can handle almost any project you throw at it.

Now that your printer’s ready and your lines are primed, it is time to actually make something!

What’s Next?

If you are ready to put that new printer to the test, check out my No-Fade Guide to Sublimation Shirts. I’ll show you exactly how to get those vibrant, permanent designs on fabric and how to avoid the “70% Rule” trap that ruins so many beginner projects.

Sublimation Printer Conversion FAQs

Can I use a printer for sublimation and regular printing?

No, you really can’t. Once you put sublimation ink into the lines, it’s a one-way street. Because sublimation ink is permanent and requires heat to activate, you can’t just “swap” it back and forth with regular ink. If you tried, you’d end up with contaminated colors and a ruined machine.

If you want to be able to switch between printing with regular and sublimation ink, you will need two separate printers (this is the setup I have).

Why would you convert a printer to a sublimation printer?

The biggest advantage is definitely the cost. A dedicated, “pro” sublimation printer can easily cost you $600 to $1,500, but you can get a brand new Epson EcoTank for a fraction of that. By converting it yourself, you’re getting professional-grade results on a hobbyist budget.

However, it’s not just a “set it and forget it” project. While the physical act of filling the tanks is as simple as changing the ink, you’re essentially becoming your own tech support. You’ve gotta stay on top of a weekly maintenance schedule to prevent clogs and deal with software “traps” like the waste ink sensor. Because this is a “one-way street” that voids your warranty, I only recommend it if you’re dedicated to a separate, sublimation-only machine. If you’re willing to handle the quirks, it’s the most cost-effective way to get into the hobby.

Which printers cannot be used for sublimation?

Any printer that uses “thermal” printing is a total no-go for sublimation. This includes almost every model from Canon and HP. These printers use heat to “boil” the ink onto the paper, which would activate the sublimation ink inside the print head and cause a permanent, unfixable clog before you ever finish your first page.

Brother printers are a bit of a grey area. While some of their models actually use “Piezo” technology (which doesn’t use heat), I still don’t recommend them. The main issue is that you can’t easily adjust the ink and color settings for sublimation on a Brother machine, so your final results will usually look dull or “off.” To save yourself the headache, it’s best to stick with an Epson EcoTank where the settings are tried, tested, and proven to work.

Why can't I use my current printer for sublimation?

Technically, you could convert the printer you’re using right now, but I don’t recommend it. The biggest issue is contamination. If your current printer has ever had regular inkjet ink in it, there will be residue left in the internal lines and the print head. Even a tiny bit of that old ink will mix with your sublimation ink and make your designs look muddy, splotchy, or just plain dull.

You’ve also got to remember that this is a “one-way street.” Once you put sublimation ink in, you can’t easily go back to regular printing. If you’re an artist who uses a high-end giclee printer, for example, you’ve got to decide if you’re willing to lose that machine for your fine art prints forever. Between the risk of ruining your colors and the massive chore of flushing out old ink, it’s almost always better to start with a brand-new, dedicated EcoTank so you know your “blank slate” is perfectly clean.

Is it difficult to make an Epson Ecotank Sublimation Printer?

The physical setup is easy, but “living” with the printer takes a bit of work. As long as you’re careful about the bottle design when you fill it and you commit to a weekly maintenance print, it’s a very manageable project for most crafters.

How much will it cost to convert my printer to a sublimation printer?

The cost to convert a printer is almost always going to be much cheaper than buying a dedicated sublimation machine, but it really depends on how much “elbow grease” you’re willing to put in. You can find used EcoTanks on Facebook Marketplace for as low as $50, but remember that you’ll need to spend an extra $10 on printer flush and spend a few hours cleaning the lines to make sure it’s safe to use.

I personally recommend buying a refurbished Epson EcoTank on eBay, which is what I did. It saved me about $50-$100 compared to a brand new model, but because it was refurbished, I could be 100% sure the lines were clean and it would work perfectly right out of the box. Between the printer and a set of quality ink (which’s usually around $25 to $35), you can expect to spend somewhere between $150 and $300 total. It’s a small investment that will save you thousands in the long run compared to buying professional equipment.

What kind of inks do I need for sublimation printing?

You need specialized “Sublimation Ink” (I recommend this one with the syringes, which will make it easy to fill). Regular inkjet ink or “Pigment Ink” won’t work because they don’t have the chemical properties to turn into a gas and bond with polyester fibers.


You can also review my full guide to sublimation inks to find the right one for you.

How do I clean my Epson Ecotank sublimation printer after printing with sublimation inks?

You don’t actually need to “clean” it after every use, but you do need to keep the ink moving. Running a simple small color test print once a week is the best way to prevent the ink from drying out and causing a clog.

What type of paper do you use in an Epson Ecotank sublimation printer?

For best results, it’s recommended to use a high quality sublimation paper (this is the one I use). This type of paper is specifically designed for dye-sublimation printing and will help you get the best results from your prints.

You are also able to use regular printer paper, but the results won’t be as vibrant.

Can I fix a "Waste Ink Pad" error myself?

Technically, yes, you can physically clean the pads, but the printer’s software’ll still think it’s full. It’s a “software lock” designed by the manufacturer. You’ll usually need a third-party reset utility to “tell” the printer the pads are clean so it’ll start working again.

More Crafts to Try

Get the latest DIY tutorials, reviews, and crafting updates

You'll never be spammed and can unsubscribe at any time

epson ecotank printer filled with sublimation ink and sublimation paper with the title "DIY tutorial - sublimation printer - how to convert an epson ecotank into a sublimation printer, abcrafty.com"

How to Convert an Epson Ecotank Printer to a Sublimation Printer

A "warts and all" guide to converting a brand-new Epson printer. Learn how to avoid the messy bottle traps, handle the one-way setup, and keep your machine from clogging.
Yield 1 Epson Ecotank Sublimation Printer
5 from 2 votes
Prep Time 10 minutes
Project Time 20 minutes
Printer Filling it's Lines 15 minutes
Total Time 45 minutes

Materials
  

  • Sublimation Ink
  • Regular Printer Paper For initial alignment and nozzle checks.
  • Sublimation Paper For your first real test after setup.

Equipment

  • 1 Epson Ecotank Printer
  • Needle and Syringe Kit Optional, but recommended to avoid the "Black Ink Disaster

Instructions
 

  • Get your Epson Ecotank ready. Start with your new or refurbished printer unplugged. You do not want the machine to try and "prime" the lines while the tanks are still empty.
    showing the front of a refurbished epson ecotank 2800 printer without any ink in it
  • Unscrew the tops of your sublimation ink bottles and remove the foil seals. Tip: Do this over a paper towel to avoid stains.(I recommend this one)
    Sublimation Ink
    A sub sublimation ink in yellow, pink, blue, and black
  • Open the front panel of the printer to access the link loading area.
    pointing to the open ink cartridge to put the sublimation ink
  • Carefully insert your black ink bottle into the BK port. Warning: Only open one tank lid at a time. If the bottle doesn't "click" in perfectly, it can leak. Watch the reservoir window closely and stop at the max fill line. If the ink you're using uses a syringe, use that to fill the tank.
    placing the black ink into the fillable cartridge on the epson ecotank 2800 printer
  • Remove the bottle from the hole by gently pulling it straight up. Then close the lid to the cartridge. Repeat the process for Yellow (Y), Cyan (C), and Magenta (M). Ensure you're matching the correct bottle to the correct tank to avoid permanent contamination.
    yellow sublimation ink filling the cartridge on an epson ecotank sublimation printer
  • Plug in the printer and follow instructions for alignment and printing setup. This will pull ink from the tanks into the internal lines. Use regular, cheap printer paper for this. Run the alignment and nozzle checks until you see a perfect, break-free pattern.
    Regular Printer Paper
    epson ecotank printer filled with sublimation ink and sublimation paper
  • Because the priming process pulls ink into the lines, your tanks will drop slightly. Add more ink to reach the max fill line before putting the bottles away.

Notes

  • The Weekly Workout: To avoid the 30-day clog I experienced, print a small color test page at least once a week.
  • The Bottle Warning: If you are using "flip-and-push" bottles, be extra careful. If they don't sit right, they can leak and mess up your floor or the other open tanks.
  • The Overfill Trap: Avoid running too many "Power Cleaning" cycles. Each one fills the internal waste ink pads faster, which can eventually "brick" the printer via the software.
  • Don't waste your good paper:�When testing the printer initially, just use simple printer paper. No need to use your good sublimation printer since those sheets will get tossed anyways.
Troubleshooting & Maintenance
  • The 30-Day Clog: If you haven't used your printer in a month and it won't print correctly, don't panic. Run the "Nozzle Check" and "Head Cleaning" tools from the printer menu. In my experience, two or three standard cleanings will usually clear a month-long clog.
  • The "Total Flush" Nightmare: If you let the printer sit for several months, standard cleanings won't be enough. You'll likely need to perform a "Power Cleaning" or even use a manual line-flushing kit. To avoid this, just commit to a weekly test print.
Handling Errors
  • The "Waste Ink Pad" Error: If your printer says it's at the "end of its service life," it's likely the waste ink pad counter. Even if you physically clean the pads, you'll need a third-party software reset to get it working again. This is a common hurdle with converted printers, so be prepared to look for a reset utility online.
  • Leaky Fills: If your ink bottle isn't "clicking" into the port, stop immediately and check the alignment. If ink leaks into the other open reservoirs, you'll need to flush the lines and start again.
Keyword Epson, Printer, Sublimation, Sublimation Ink

I feel like a rock tumbler is either something a crafter has used or wants to get so with this Black Friday deal, now is the time! The Komestone Rock Tumbler is a fantastic rock polisher that’s easy to open and will polish rocks, stones, glass, and make them shiny and smooth. It’s also included in my list of the best rock tumblers!

The rocks can be used to create jewelry, decorative items, ornaments, and more – it’s a great way to add a unique touch to your craft projects. Get it for 20% off for a limited time at $55.98!

Sale Ends: 11/28/22

Picture of Daniela Kretchmer

Daniela Kretchmer

Daniela is a lifelong crafter who loves to share her passion for crafting. Through classes or learning on her own, she likes to say she'll do pretty much any craft aside from scrapbooking. Her current personal obsessions include garden crafts, felting, and spinning yarn.

More Craft Projects and Ideas

5 thoughts on “How to Convert an Epson to Sublimation: The “No-Clog” Reality Guide”

  1. When it asks to download firmware should I? My last epson sublimation said not to download firmware that it would ruin the sublimation process. Please help

    1. I personally have not had any issues with updates. The only concern that I’ve heard that exists is the color profile may change so colors might be off and you’d need to reset them if that happens. Therefore some people choose to update the firmware prior to turning a printer into a sublimation printer and then turn off updates. But I personally allow updates as there are other bugs or issues Epson may be updating.

  2. 5 stars
    Hi thank you for the content. so easy to understand. However I have just one clarification question. I got a refurbished printer from Epson. Should I still flush the lines.
    I believe you said that you did not since it was NEW (refurbished)

    1. If it has been used before with regular ink, you’ll want to flush the lines. If it hasn’t, then the lines should be clear and you won’t need to flush it.

Leave a Comment

Your email address will not be published. Required fields are marked *

Rating