How to Set Up a Mason Bee House for Success

A completed, house-shaped wooden bee house with an internal grid fully stocked with natural and paper-lined nesting reeds, mounted on a weathered grey fence. title reads "perfect mason bee setup"

There’s nothing quite like the first few days of spring here in Nashville when the garden starts to wake up. As the temperatures start to rise, it’s time to start thinking about my favorite early-season pollinators. I’ve been focused on making my backyard as native pollinator-friendly as possible, and a well-maintained mason bee house is one of the best additions you can make.

These bees are solitary, calm, and incredible at their jobs. Since they don’t have a hive to protect, they’re not aggressive, which makes them the perfect garden companions. Whether you’re building a mason bee house for the first time or setting up a professional kit, the goal is to create an environment that’s both inviting and safe.

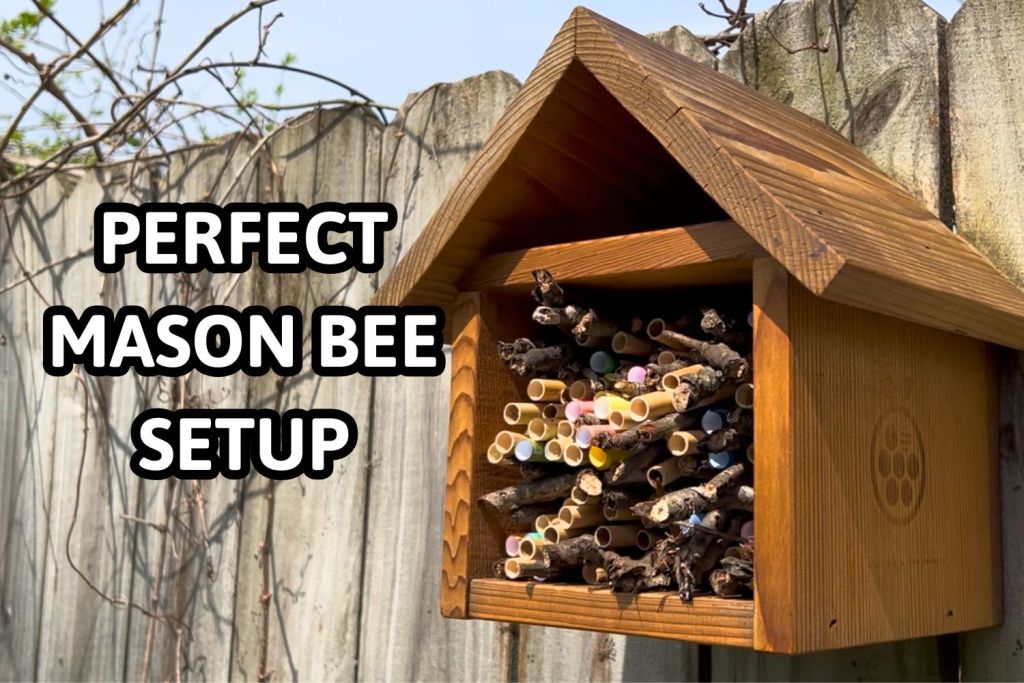
Here’s my complete process for setting up a successful bee hotel, including a full restoration of my older house and a fun way to get creative with your own DIY inserts.

Table of Contents

Note: Some links in this post may contain affiliate links, which means at no cost to you, I may earn a commission.

Get the latest DIY tutorials, reviews, and crafting updates

You'll never be spammed and can unsubscribe at any time

Don’t forget to pin it so you can easily come back to it later!

A vertical three-part collage showing the steps to set up a mason bee house for success. The top panel shows hands restoring a weathered wooden bee hotel, the middle panel shows hands making colorful diy mason bee house tube inserts from paper, and the bottom panel shows the finished bee house mounted on a garden fence filled with natural reeds and sticks. Text overlays include "RESTORATION," "DIY REEDS," and "HABITAT TIPS" with the website address www.abcrafty.com at the bottom.

Materials and Supplies

To make this DIY mason bee house project a success, you will need a mix of restoration tools and basic craft supplies. A lot of these are from Crown Bees – use code ABCRAFTY to let them know I sent you!

For the House Restoration:

  • Mason Bee House: I used the Bee Chalet from Crown Bees

  • 150 Grit Sandpaper (Amazon): To scuff the wood and remove weathering.

  • Brazilian Rosewood Oil (Crown Bees): A bee-safe finish to protect the wood.

  • Cleaning Cloth or Towel (Amazon): For wiping away dust and applying oil.

For the DIY Mason Bee Tubes:

  • Printer Paper: This will be the main material for the bee house inserts

  • Acrylic Paint Markers (these are the ones I have): These will help provide signals to the bees of which house is theirs

  • 8mm Rolling Tool: A pen, pencil, or dowel that is exactly 8mm in diameter. (This is what I used, but their are also dowels)

  • Tape (Amazon): To secure the paper seams.

  • Air Dry Clay (Amazon): To seal the back end of each bee reed.


For the Final Setup:

  • Natural Reeds (Crown Bees) and Sticks/Twigs: To provide variety in the house

  • Bird Guard (Crown Bees): To protect the mason bee tube inserts from predators (and from falling out!)

  • Invite-a-Bee Spray (Amazon): To help attract bees to the new setup.

  • Mason Bee Cocoons (Amazon): You can actually have these shipped directly to you!

Watch the Video: Mason Bee House Setup and Restoration

Step 1: Refreshing Your Mason Bee House

If you already have a bee house in garden spaces from previous years, you do not necessarily need to buy a new one every spring. I have had my Crown Bees house for a few years, and while it was looking weathered, a quick restoration brought it back to life.

 Pro Tip: Make sure to do this restoration about a month before you want the bees to move in. This gives the oil plenty of time to dry and the scent to dissipate.

1. Sand the Wood

Use 150 grit sandpaper to sand the house down, inside and out. This removes the gray, weathered surface and allows the oil to soak in properly. It is a dusty job, so I recommend doing this outside and wearing a mask!

Hands are holding up an unpainted wooden house bee box from the side, while another hand uses a small piece of sandpaper to sand the top

2. Wipe Clean

Use a lightly damp paper towel to remove any leftover sawdust.

two hands are holding up a wooden house-shaped box from the bottom while wiping it with a paper towel

3. Apply the Oil

Use a towel to wipe on the Brazilian rosewood oil. It gives the wood a gorgeous, golden finish and protects it from the elements.

 Pro Tip: Skip the brush and apply your oil with a towel instead. It makes it much easier to get into the nooks and crannies, and you will find the bottle lasts twice as long because you aren’t wasting oil in the bristles.

A close-up of a hand using a blue tie dye towel to apply oil to the inside surface of an empty wooden bee box.

Get the latest DIY tutorials, reviews, and crafting updates

You'll never be spammed and can unsubscribe at any time

Step 2: How to Make Bee Box at Home Tubes

While you can buy mason bee tube refills from Crown Bees, making your own is a great way to save money and get creative. This is the “Crown Bee Dave” approved way to make DIY tubes that are safe for your mason bee cocoons.

DIY Mason Bee Tube Specifications

f you want to know how to make a bee house setup that actually works, you have to get the measurements right. These specs protect the mason bee cocoons from pests like wasps or birds.

 
Feature Measurement
Starting Paper Size
6 inches by 8.25 inches
Mason Bee Tube Diameter
8mm (the size of a standard pencil)
Bee Tube Length
6 inches
Final Mason Bee Tube Size
6 inches by 8mm
Tube Thickness
5-6x wrapped around

1. Cut the Paper

Cut basic printer paper to 6 inches x 8.25 inches. Each rectangle will make a single mason bee tube.

Hands use a green paper trimmer to cut a sheet of paper with red and pink lines, with an overlay specifying "Cut Paper to 6 inches by 8.25 inches".

2. Color for Clarity

Use your markers to color the edge of the long side of the paper. Bees see blues, purples, and yellows best. These colors help them identify which bee reed is theirs in a crowded house.

 Pro Tip: Use yellow, purples, blues, and greens as these are the colors that mason bees see best! This will help them find their “front door” more quickly!

close-up shot of a hand using a red marker to create thin, colorful vertical lines on a piece of white paper.

3. Roll the Tubes

Wrap the paper tightly around your 8mm tool (I used these pens). You want the paper to go around 5 or 6 times to make it thick enough that pests can’t eat through the sides and reach the larvae.

hands rolling a piece of white paper with blue edge around a pen or marker.

4. Seal the Ends

Tape the seam, remove the pen, and plug the non-colored end with a small ball of air dry clay (Amazon). It is vital that the back of the tube is completely sealed!

Close-up of hands meticulously adding clay to the bottom of rolled up diy bee tube inserts

Step 3: Final Bee Hotel Assembly

A successful bee house setup should look varied and natural.

 Expert Tip: Making your mason bee house more natural looking not only helps it blend beautifully into your garden, but also the “randomness” helps bees find their own reeds.

1. Pack the Reeds

Combine your DIY paper tubes with natural reeds and sticks from your yard. Stagger the tubes so some stick out further than others. This visual variation helps the bees navigate.

A hand is carefully inserting a bundle of natural wooden sticks and reeds into the open central cavity of a house-shaped wooden bee box.

2. Add Protection

Install a bird guard over the front to keep critters from pulling out your mason bee tube liners. This is the guard I have.

hands push a complete, house-shaped wooden bee box, with its mesh front, onto a weathered grey fence line

3. Invite the Bees

Give the entrance a quick spritz of attractant spray and place your house in a spot that gets plenty of morning sun (this means ideally it would face south-east). In terms of height, you’ll want to place it at eye-level so you’ll be able to easily watch your bees!

Whether you’re attracting local bees or having mason bee cocoons shipped to you to start your population, having a perfect setup ready to go is the best way to ensure success.

Make sure there’s mud! Mason bees love mud – it’s how they seal in and protect their larvae. Make sure you either have natural mud in your garden 10-20 ft from the house. Being in Nashville, my yard is pretty much all clay mud, but if that’s not your landscape, no worries! You can get it separately from Crown Bees.

A hand is using a clear plastic spray bottle to mist bee attractant over the wire mesh front of a completed wooden bee house.

Get the latest DIY tutorials, reviews, and crafting updates

You'll never be spammed and can unsubscribe at any time

Common Mason Bee House Challenges

Problem Likely Cause The Fix
Reeds falling out
Birds or small critters pulling them out.
Install a bird guard and ensure the house is packed tightly with extra sticks.
Bees ignoring the house
Poor location or lack of sun.
Move the house to a spot that gets direct morning sun and is at least 3-5 feet off the ground. You can also try using some bee attractant!
Pests/Wasps in tubes
Ensure you roll the paper 5-6 times and use air dry clay to seal the back of every bee reed.
Immediately rinse the tub with clean water after draining the bath.
Wood looks weathered
Natural exposure to the elements.
Perform a yearly restoration with 150 grit sandpaper and Brazilian rosewood oil.

If you’re seeing something else in your garden that doesn’t look right, drop a comment below and I’ll help you figure it out!

A completed, house-shaped wooden bee house from crown bees with an internal grid fully stocked with natural and paper-lined nesting reeds, mounted on a weathered grey fence. the house is the bee chalet from crown bees

FAQ: Common Questions About Raising Mason Bees

Do mason bees sting?

One of the best things about these bees is how calm they are. Because they are solitary bees, they do not have a hive or a queen to protect. They are very unlikely to sting, and even if they do, it is much less painful than a honeybee or a wasp. They are perfectly safe to have around kids and pets!

Why are they better pollinators than honeybees?

Mason bees are often called “super pollinators.” While honeybees are very organized, mason bees are “messy” pollinators. They do a “belly flop” into flowers, which gets pollen all over their bodies and transfers it much more efficiently. In fact, one mason bee can do the work of up to 100 honeybees!

When should I put my mason bee house in garden spaces?

You should have your bee hotel ready to go when the daytime temperatures are consistently around 55°F (nighttime temperatures aren’t important). For most of us, this is early to mid-spring. You want the house set up and your mason bee cocoons ready to emerge just as the fruit trees and spring flowers start to bloom.

How long do mason bees stay active?

These bees have a short but busy season. They are usually active for about 4 to 6 weeks in the spring. Once the females finish laying their eggs in your mason bee tube inserts, they are done for the year. You can then swap the tubes out for smaller sizes to host leafcutter bees for the summer!

Can I really have bees shipped to my house?

Yes! You can order mason bee cocoons online and have them shipped directly to you by Crown Bees. They arrive in a dormant state, and you simply keep them in the refrigerator until the weather is right. Once it is 55°F outside, you place them in your mason bee house and watch them wake up.

This is exactly how I started my mason bee journey! And yes, it is incredibly funny to have mason bees in your fridge – especially when they start hatching (they’re so stinking cute!)

Get Your Garden Ready

If you are ready to start raising your own bees, I have linked my favorite supplies below. Be sure to use code “ABCRAFTY” at checkout to let them know I sent you!

Restoring and setting up a mason bee house is such a rewarding way to spend a spring afternoon. It is a simple DIY bee hotel project that pays off all summer long with a healthier, more vibrant garden. Do you have any questions about how to make a bee house setup work for your specific yard? Let me know in the comments below!

More Crafts to Try

If you enjoyed setting up your mason bee house and want to keep making your garden a haven for nature, you might like some of these other projects:

Get the latest DIY tutorials, reviews, and crafting updates

You'll never be spammed and can unsubscribe at any time

Picture of Daniela

Daniela

Daniela is a lifelong crafter who loves to share her passion for crafting. Through classes or learning on her own, she likes to say she'll do pretty much any craft aside from scrapbooking. Her current personal obsessions include garden crafts, felting, and spinning yarn.

More Craft Projects and Ideas

Leave a Comment

Your email address will not be published. Required fields are marked *