Ice Tie Dye: The Master Guide to Watercolor Tie Dye Techniques

pink, orange, and yellow dye getting sprinkled onto ice with the finished ice dye shirt with the title "ice tie dye"

Learn how to ice tie dye to create a unique watercolor dye effect. Follow along with this ultimate guide to master multiple ice dye techniques, customize your layout, and get vibrant results every single time.

Table of Contents

Ice tie dye is a unique tie dye technique that makes beautiful and unpredictable results. You can use it on anything you’d want to tie dye including shirts, socks, shorts, a crop top, and even shoes. (I even used this technique to dye frisbee golf discs, so you don’t have to limit yourself just to clothes!)

Normally when tie dyeing, you mix dye powder with water to create a liquid dye that you pour onto the clothing one color at a time. When you ice dye, however, you don’t actually mix the dye powder or tie dye kit with water. Instead, you use the powder on its own and sprinkle each color over ice. As the ice melts, it mixes with the the powder and spreads into the clothing. The colors can also mix together, creating incredible marble and watercolor effects.

Because there are so many fun ways to approach it,  I’ve broken down the three major design choices you can make to customize your patterns before we jump into the master step-by-step tutorial.

Note: Some links in this post may contain affiliate links, which means at no cost to you, I may earn a commission.

Don’t forget to pin it so you can come back to it later!

pink, orange, and yellow dye getting sprinkled onto ice with the finished ice dye shirt with the title "ice tie dye"

Choose Your Design Adventure: Customizing Your Pattern

Before you start, it helps to understand the different variables you can play with. By changing how you tie your fabric and how you place your powder, you can completely customize how the dye flows and reacts with the ice.

Part 1: Your Folding and Tying Choices

  • The Tied Scrunch (Classic Ice Dye): For this look, you scrunch your damp fabric up tightly and secure it firmly with rubber bands or zip ties. This method creates deeper folds, which gives you random, flowy designs and allows for more dramatic color breaking as the pigments separate down into the tight creases.

  • The Loose Crumple (No Ties): For this option, you skip the rubber bands and zip ties entirely, but still loose-scrunch the fabric into a soft nest directly on top of your support pedestals. This setup allows the melting ice to pass through the loose folds evenly, which generally produces bolder colors, less color breaking, and more of a seamless, open watercolor look.

  • A Structured Tie Dye Pattern: You can absolutely combine ice dyeing with traditional tie dye designs! You can prep your shirt ahead of time using any standard folding technique, like a spiral, bullseye, or a heart design. (Be sure to check out my full list of traditional tie dye patterns for easy, step-by-step folding layouts). Tying a specific pattern ahead of time gives you the absolute best of both worlds, a clearly defined structural design blended with the gorgeous, soft watercolor texture of melting ice.

Part 2: Your Dye Powder Placement Choices

  • Random Scattering: Carefully sprinkling your different color powders randomly across the ice allows the pigments to bleed and run together organically. This is perfect if you want your colors to blend into beautiful transition shades, like red and blue melting together to form purple.

  • Linear Stripes or Sections: Applying your powders in clean, parallel rows or separate sections across the ice keeps specific colors more isolated. This allows your colors to stay bright and distinct on the fabric, preventing them from mixing completely or turning muddy.
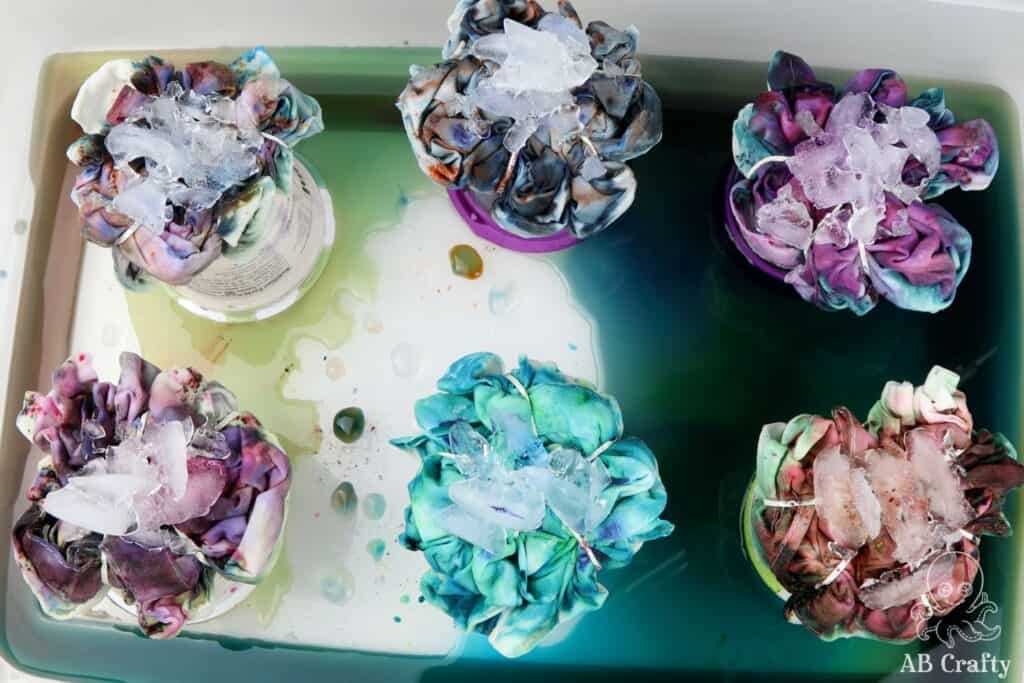
6 tote bags tied up and in the process of getting ice tie dyed

Understanding Your Dyes: What is "Color Breaking"?

Before picking out your colors, it helps to understand how different powders react to ice. You can use standard tie dye powders, or you can get dyes specifically created for ice dyeing, such as the specialized kits from Jacquard (you can use my code ABCRAFTY for 20% off!).

What makes specialized ice dyes unique is that the colors “break.” “Breaking” is when a single powder color naturally splits into the individual component pigments that were used to make it. For example, a mixed purple dye powder isn’t a single element – it’s made up of distinct blue and red pigments. When you sprinkle that single purple powder over ice, the blue and red pigments dissolve at slightly different rates as the ice melts. This causes the single color to split across your fabric, creating gorgeous, multi-toned highlights of pink, blue, and violet without requiring you to buy or mix multiple jars of dye.

Unless a dye powder is a pure primary color, it is made of various component pigments. Powders formulated specifically to break are designed so these beautiful color separations stand out dramatically on your final piece.
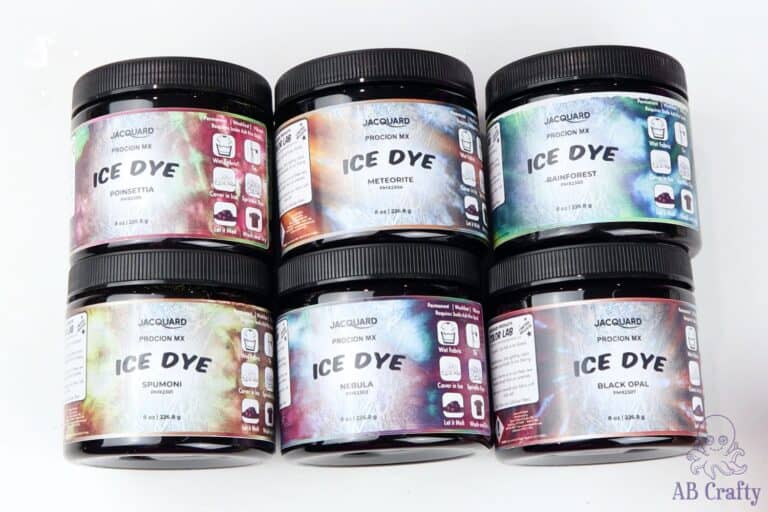
You can see these specialized ice dyes in action in my blog post where I test and swatch each one: Jacquard Ice Dye Swatch Guide

Materials for Ice Tie Dye

Material / Tool Where to Buy
White Cotton Shirt
Tie Dye Kit

I recommend this kit in jars with soda ash from Jacquard or you can see my full list of the best tie dye kits. (Use code ABCRAFTY for 20% off!)

Specialized Ice Dyes

Shop on Jacquard (Use code ABCRAFTY for 20% off!)

These unique dyes “break” on their own, meaning they separate into their underlying component colors on their own without needing multiple jars of dye.

Soda Ash (if the kit doesn’t have soda ash)

Shop on Jacquard (Use code ABCRAFTY for 20%) or Shop on Amazon

Zip Ties or Rubber Bands
Ice

Available at home

Bowl or Dish
Empty Containers or Raised Wire Rack
Plastic Spoon (optional)
Face Mask or Respirator Mask
Synthrapol

Shop on Jacquard (Use code ABCRAFTY for 20% off!)

This is a detergent designed specifically to gently remove excess dye particles, keeping your shirts vibrant!

Jacquard Procion Mx Dye Set9%
$19.19 ($7.27 / Fl Oz)

Safety Note: Because you are working directly with fine, un-dissolved dye powder, always put on a protective mask before opening your jars. Always work in a well-ventilated area safely away from any family pets, as loose dye powder should never be inhaled. Additionally, any dishes or racks used for your dye setups should be permanently retired from your kitchen and only used for crafts, not food.

Video Instructions

The Master Step-by-Step Ice Tie Dye Tutorial

This step-by-step technique is perfect for creating deep, rich watercolor folds and classic marble patterns.

Step 1: Prepare and Soak the Shirt

Start by soaking your shirt or whichever clothing you are going to ice dye, in a soda ash mixture. Mix 1 cup of soda ash (which you can get from Jacquard for 20% off with code ABCRAFTY or from Amazon) with 1 gallon of water. (This is the shirt I’m using)

Even if you’re using a convenient “one-step” tie dye kit that claims it doesn’t require a fixative step, I always highly recommend doing a proper soda ash soak anyway, it guarantees your colors turn out as bright and vibrant as possible!

soaking a plain white t shirt in a plastic bin with water

Step 2: Shape and Tie Your Fabric

Thoroughly squeeze out the excess liquid from the soda ash soak. Now, choose how you want to shape your fabric based on your folding goals:

  • For the Tied Scrunch: Scrunch the damp shirt up tightly, exactly as though you are preparing a classic crumple dye. Secure the crumpled fabric firmly using zip ties or rubber bands to hold all those wonderful texture folds in place.

  • For the Loose Crumple: Skip the ties completely. You will place the loose shirt directly over your support pedestals in the next step, using your fingers to loose-crumple the fabric into a soft nest as you arrange it across the supports.

  • For a Structured Pattern: Fold and secure your shirt into a spiral, bullseye, heart, or any other traditional pattern using rubber bands or zip ties.

These are the zip ties I have – I absolutely love them because they’re reusable so they can work for endless dyeing sessions!

Wrapping a crumpled white cotton shirt with black zip ties
Scrunching a white cotton shirt elevated in a glass 9x13 pan

Step 3: Elevate the Fabric

Place your tied-up shirt inside a deep bowl or baking dish, making sure it sits elevated on a support system. I love to use empty, clean yogurt containers flipped upside down to act as pedestals, but a sturdy wire craft rack works perfectly too.

The reason you want to elevate the shirt is that when the ice melts, it will fill the bottom of the bowl. You don’t want the pooling water to touch your fabric and muddy your clean watercolor look, so make sure whatever supports you use raise it high enough to clear that drainage space.

Tip for loose fabric: If you chose the loose crumple option without ties, make sure to pile your ice directly over the spots where your yogurt containers are sitting underneath. This keeps the shirt completely secure. If you dump heavy ice on areas that do not have a support cup directly under them, the heavy weight will pull the loose fabric down into the bottom of the dish.

Placing a tied up white shirt on top of yogurt containers in a glass 9x13 pan

Step 4: Add the Ice Layer

Completely cover the top of your secured, elevated shirt with ice cubes. There’s no such thing as too much ice!

If you can, I recommend putting tall objects around your shirt so that you can pile on even more ice.

Ice cubes covering a shirt on top of yogurt containers in a glass 9x13 pan

Step 5: Apply the Powdered Dye

Put on your protective mask and make sure you are in a well-ventilated space. Grab a plastic spoon, open your jars, and apply your powder according to your design choice. This is the kit I recommend for this project – use code ABCRAFTY to get it 20% off! or you can also find it on Amazon:

  • To allow colors to blend: Carefully sprinkle your different standard color powders randomly across the ice cubes, starting with your lightest color choice first.

  • To keep colors more distinct: Apply your powders in clean, parallel rows or isolated sections across the ice instead of placing the dye randomly. Leave a little bit of open, clean space between the colors so they run down in distinct paths without mixing completely.

  • For single-jar color breaking: If you are using dyes made specifically for ice dyeing (such as these from Jacquard), simply sprinkle that single color all over the ice and watch it separate on its own as it dissolves.

The more powder you add, the deeper and more saturated your final design will be. If you prefer a soft, airy watercolor effect, use less dye.

Sprinkling red powdered dye over ice on top of a shirt with yellow powdered dye on it

Pro Tip!: Keep color theory in mind as you place your powders, since the pigments will naturally run and bleed together as the ice melts. Placing blue right next to red will create beautiful purples, so arrange your layout intentionally. The more powder you add, the deeper and more saturated your final design will be. If you prefer a soft, airy, pastel watercolor look, use a lighter hand when sprinkling your powder

Sprinkling blue powdered dye over ice on top of a shirt with yellow and red powdered dye on it
Sprinkling bright yellow dye powder on top of ice in two rows on top of a white shirt

Step 6: Let the Ice Melt

Now, just let your setup sit and melt completely. The exact amount of time it takes depends on your room temperature and how much ice you used, but expect it to take around 12 hours for all the ice to melt away. You will see the powder dissolve and start to drip beautiful tracks down into the shirt folds within just a few minutes.

Ice covered in yellow, red, and blue powdered dyes melting and dripping onto the white shirt underneath, starting the ice tie dye process.

Step 7: Let the Dye Set, Rinse, and Wash

After the ice has fully melted, leave the shirt alone in its container so the dye can set completely for a full 24 hours. Once that time is up, remove the shirt from the dish and rinse it thoroughly under a running cold tap until the water runs completely clear. Lastly, cut away your ties and throw the garment into the washing machine with other tie-dyed clothes just in case there’s any remaining loose dye. Then, your new custom ice-dyed shirt is ready to wear!

Pro Tip!: When rinsing, start with cold water first and then increase it to warmer water. The gradual increase will keep the colors vibrant. Then I like to use Synthrapol to wash my freshly dyed items as it’s a gentle soap designed specifically to help remove loose dye particles.

Style Gallery: How My Setups Turned Out

Setup 1: The Classic Tied Scrunch with Blended Colors

For my first shirt, I used the classic tied scrunch method paired with a random powder layout to let the colors blend. I used a blue, a red, and a small bit of yellow powder scattered organically across the ice cubes. Because the blue and red naturally mixed together as they melted, the final shirt features a stunning mix of deep violets, rich pinks, and tiny sections of green and teal. It has more sharp lines and angles from the structured and tied folds.

Sprinkling blue powdered dye over ice on top of a shirt with yellow and red powdered dye on it
finished blue, purple, and pink ice tie dye shirt

Setup 2: The Direct Container Loose Crumple with Distinct Rows

For my second shirt, I wanted to test the loose container crumple method without using any rubber bands or zip ties, combined with a linear powder placement to keep the colors distinct. I laid the fabric loosely over my yogurt containers and applied my dye powder in deliberate, clean parallel rows across the ice. Because the colors didn’t fully mix, the result is a gorgeous, bold color payoff with a soft sunburst effect, clear transitions, and zero harsh white bind lines.

Sprinkling dark red dye on top of ice cubes that have stripes of yellow and red dye over a shirt.
finished pink, orange, and yellow ice tie dye shirt

Get the latest DIY tutorials, reviews, and crafting updates

You'll never be spammed and can unsubscribe at any time

Setup 3: The Single-Jar "Color Break" Test

To test out specialized ice dyes, I used a single jar of Jacquard Ice Dye powder applied over an elevated, tied shirt setup (these are the ones I used). Instead of staying a single solid tone, the single powder beautifully split apart into its underlying pigment elements as the ice melted. For example, using a single purple formula created shades of purple, maroon, blue, pinks, and even greens!

You can see all of the color swatches from the full line in my post testing each of the Jacquard Ice Dyes.

using a plastic spoon to sprinkle dye over ice onto tied tote bags using a jacquard ice dye
two tie dye ice dyed tote bags in a scrunch dye and spiral dye pattern with the jacquard ice dye container on top in the color poinsettia

Ice Tie Dye Troubleshooting Matrix

Problem Likely Cause The Fix
Colors turned muddy or brown
Contrasting colors (such as red and green) bled and mixed together as the ice melted.
Place matching colors next to each other, or leave small empty spaces of ice between contrasting shades to keep them isolated.
Dark spots or specks of color
The dry dye powder did not fully dissolve before hitting the shirt fabric.
lways make sure you have plenty of ice to cover the shirt completely so no fabric is left exposed. If dye powder does get directly onto the shirt by accident, flush that spot with a little water right away to dissolve and spread the pigment.
Colors washed out completely
The shirt was not 100% cotton, it didn’t soak in soda ash, or it didn’t set long enough.
Always use 100% natural fibers such as cotton, perform a soda ash soak, and let the damp fabric set for a full 24 hours.

Ice Tie Dye FAQs

Can you use regular tie dye powder for ice tie dye?

Yes, you can use the dry powder from regular tie dye kits. Just make sure to soak your fabric in a separate soda ash mixture first if your kit does not include it, as the fixative is what locks the vibrant color into the fibers. You can get it separately from Jacquard (Use code ABCRAFTY for 20%) or on Amazon.

Should you use crushed ice or ice cubes?

Ice cubes melt much slower, which gives the pigments more time to split apart and create dramatic watercolor patterns. Crushed ice melts faster, which leads to less breaking and less blending.

Does the amount of ice you use matter?

Yes! I’ve found that using more ice creates more of a watercolor effect and helps the colors “break” more. So I always recommend piling the ice as high as you can!

Do you rinse ice tie dye with hot or cold water?

Always start with a cold water rinse to wash away the loose surface powder so it doesn’t stain the white areas of your shirt. Then, gradually warm up the water to get out the remaining excess dye before throwing it in the washing machine.

I absolutely loved making these ice tie dye shirts and am looking forward to making more. Definitely play around with using different amounts of dye and different colors. When you make them, I’d love to see them! Tag me on Instagram @ab.crafty.

For more traditional tie dye, check out all of my tie dye patterns.

More Tie Dye Projects to Try

Get the latest DIY tutorials, reviews, and crafting updates

You'll never be spammed and can unsubscribe at any time

Picture of Daniela Kretchmer

Daniela Kretchmer

Daniela is a lifelong crafter who loves to share her passion for crafting. Through classes or learning on her own, she likes to say she'll do pretty much any craft aside from scrapbooking. Her current personal obsessions include garden crafts, felting, and spinning yarn.

More Craft Projects and Ideas

9 thoughts on “Ice Tie Dye: The Master Guide to Watercolor Tie Dye Techniques”

  1. 5 stars
    Thanks for this tutorial! The pictures are super helpful! I don’t have a wire rack, so it’s nice to see other options to use instead.

    1. You’re very welcome, glad you found it helpful! I also don’t have a dedicated wire rack right now for craft projects so while using one definitely would be convenient, this is at least a reasonable alternative.

  2. My wife loves tye dyes. This gives me an idea to do a bed spread for her birthday. Do you think that�s possible? How much of the ash would you recommend?

    1. Love that! Absolutely it would be possible. You’ll want to use enough water and soda ash mixture to be able to soak the bedspread so it ultimately depends on the size of the bedspread. I recommend figuring how much water you would need and then figuring out how much soda ash you’d need. It’s likely you’ll need a few gallons of water which would mean a few cups of soda ash.

    2. I’m planning to do this with a small group. How much powder do you think to cover an adult small t-shirt? We would do red and blue, for a patriotic theme. Wondering how many tablespoons per shirt?

      1. It doesn’t take much! It would be much less than a tablespoon per shirt. It’s more like a 1/2 tsp. Something to keep in mind is using red and blue would create purple if they mix. So if you want to prevent mixing, keep the colors far apart. You could also consider only adding ice to some areas and a single color on that section of ice.

Leave a Comment

Your email address will not be published. Required fields are marked *